This is a recipe that is entirely someone else’s creation. I really don’t even change it – it’s delicious and works for my diet essentially as is.
I feel bad even posting it…or re-posting it for that matter. Because I can’t even say I made a few changes or swapped out a bunch of things. I didn’t. I literally removed one item from the ingredient list and it’s perfect. There’s not even salt in the original recipe.
But, if like me, you have CKD and are in need of some new recipes, I decided to post this one regardless. And honestly, even if you don’t have CKD, you should try this! It’s AMAZING and a really great item for summer. It’s light and there’s no mayo so you can easily take it to parties or outdoor get-togethers.
So without further ado, I give you…someone else’s amazing Strawberry Avocado Couscous Salad (this is my picture, however).
There’s really no revised version here. The only thing I did is to remove the pine nuts. That’s it. Everything else should be the same, so I’m copying and pasting the recipe as is (without the nuts).
Note: I did add chicken to the last version I made and it was wonderful. It became more of an entree that way. If you choose to do this, just cook a few chicken tenders and slice them into bite-sized pieces.
INGREDIENTS:
1 cup couscous
1 avocado, halved, seeded, peeled and diced
1/2 cup corn kernels (if you buy frozen, just defrost them)
1/2 cup strawberries, quartered
2 tablespoons chopped fresh cilantro leaves
Optional: Chicken (See note above)
FOR THE LIME VINAIGRETTE
1/4 cup olive oil
1/4 cup apple cider vinegar
Zest of 1 lime
2 tablespoons freshly squeezed lime juice
2 teaspoons sugar, or more to taste
DIRECTIONS:
To make the vinaigrette, whisk together olive oil, apple cider vinegar, lime zest and juice, and sugar in a small bowl; set aside.
In a medium saucepan, cook couscous according to package instructions.
In a large bowl, combine couscous, avocado, corn, strawberries, and cilantro. Stir in lime vinaigrette.
Have you had enough of my chicken recipes? Hopefully not! I am constantly on the hunt for interesting chicken recipes. Chicken is lean, has relatively low phosphorus and fills me up. But…let’s be honest. Chicken is super boring. I know I’m not alone in that thought because apparently, “chicken” is the #1 searched term on foodnetwork.com. People like me struggle to find recipes that make chicken more appealing and to keep it fresh. I mean really, how many baked chicken dishes can one person eat?
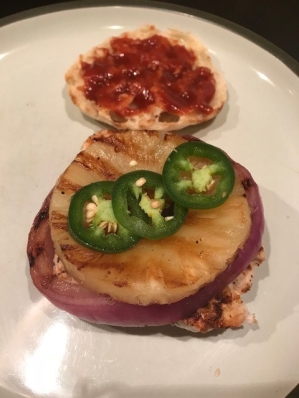
So this is a recipe that I found while trying to discover new ways to cook chicken. I love a good sandwich or burger, but substituting chicken for beef or even turkey usually makes it dry and uninteresting…but not this recipe! Why? Because it’s got a load of delicious toppings! When you pile amazing ingredients like pineapple and grilled red onion, the chicken suddenly takes a backseat and you’re left with just a really super tasty sandwich, which happens to be made with chicken. It’s genius.
A couple of notes about this recipe:
I like to make my own BBQ sauce. That way, I can control what goes into it and eliminate the salt/additives that most bottled sauces have. I’ll include a separate note below with that recipe.
This recipe is great if you have an outdoor grill, but if you don’t, I highly recommend purchasing an indoor grill pan. This is what I use and it comes out great (I live in NYC, so it’s basically impossible to grill outdoors unless you want to get arrested). You can cook everything on this handy pan so it’s only one thing to clean.
I like my chicken really thin, so I generally pound the chicken breasts so they’re all the same size and thinner than they come in the package. Then I cut them in sandwich-side pieces (usually in half). This also significantly reduces the cook time.
PREP TIME: 30 MIN COOK TIME: 15 MIN TOTAL TIME: 45 MINUTES
Ingredients:
1 lb boneless skinless chicken breast (see note #3 above, you may want to pound them thinner and cut them in half)
1/3 cup barbecue sauce** Recipe to follow
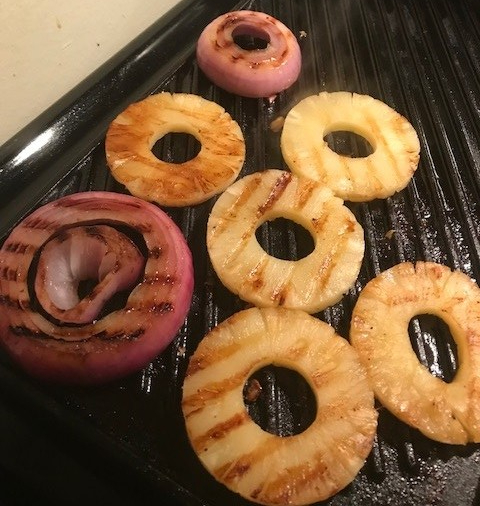
1 can pineapple rings + juice
5 tbsp soy sauce or Coconut Aminos
1 garlic clove, minced
1 tsp ginger, minced
1/2 tsp Sriracha/hot sauce (optional, more to taste)
4 English Muffins or King’s Hawaiian Rolls
1 red onion, sliced
1 jalapeno, sliced
2 cups greens
Jackie’s BBQ Sauce
1 Cup Salt-Free Heinz Ketchup
1 8 oz Can Salt-Free Tomato Sauce
½ Cup Apple Cider Vinegar
¼ Cup Agave Syrup
1/4 teaspoon garlic powder
1/4 teaspoon onion powder
1/4 teaspoon chili powder
1/2 teaspoon paprika
1 tsp ground mustard
1.5 tsp lemon juice
1 tsp Worcestershire sauce
Optional: Pinch of McCormick’s Salt-Free BBQ Seasoning (or other brand)
¼ cup water
Directions for BBQ Sauce: Really easy, just mix all of these things together. If it’s too thick, feel free to add a little extra water.
Directions for Burgers:
If you have time and plan in advance: mix together the barbeque sauce, pineapple juice, soy sauce/coconut aminos, garlic, ginger and sriracha. Marinate the chicken (that was pounded thinner) between 30 minutes to overnight.
If you don’t have time (as I usually don’t), mix this same list of ingredients and set aside.
When ready to cook, remove the chicken from the marinade letting excess drip off. Spray the pineapple slices with cooking spray. Grill the chicken and pineapple for 4-5 minutes per side or until cooked through. For thinner chicken, cook less time on each side.
If the chicken wasn’t marinading, spread the barbeque sauce/pineapple juice mixture on top of the chicken while it’s cooking. Make sure to coat both sides.
Serve layered on the hamburger roll with sliced red onion, fresh jalapeno, greens, grilled pineapple, and a drizzle of the homemade barbecue sauce.
Hello again! I’m back with another recipe. And not surprisingly, this one is inspired by my love for Asian cuisine.
To be fully transparent, this is a recipe that I found before I was on the CKD diet. It’s Weight Watchers, which is great, but because of the salt, some of the veggies, and use of brown rice, I had to adjust it slightly to work now. But it works just as well (if not better!) and I continue to love it. This recipe is completely customizable too. You can add any veggies you’d like to this dish or if you want to swap chicken for shrimp or beef or just leave it as veggie, feel free! It’s really simple and comes out just as delicious. I’ve admittedly tried this with many, many varieties and like it all the same. Also, this can easily be transformed into a side dish if you want to take out the protein altogether.
Also, because I’ve made this so many times, I’ve found a slightly better order to cook everything, as laid out in my instructions below. The method in the original Weight Watchers recipe works fine too – but I like actually stir frying the rice separately so it gets a nice yummy crispiness.
1/2 cup(s) uncooked scallion(s), chopped, green and white parts
2 clove(s), medium garlic clove(s), minced
1 teaspoon minced garlic
1 medium red pepper, diced
12 oz uncooked boneless skinless chicken breast(s), cut into 1/2-inch cubes
2 cup(s) cooked white rice
1/2 cup(s) frozen green peas, thawed
3 Tbsp of cilantro, chopped
3 Tbsp coconut aminos
1 Tbsp rice wine vinegar
OPTIONAL: 1/2 cup(s) uncooked carrot(s), diced
NOTE: If you have a wok, this is ideal for this recipe. If not, I would recommend using a large skillet that is pre-heated until hot. You can use a cast iron or nonstick, but it’s important to make sure it’s hot before you begin cooking anything. That creates the nice sear on the bottom like a wok would. It also should be a larger size – there’s a lot of food in this recipe!
Instructions
Pre-cook the rice according to package instructions. Set aside and allow to cool.
After skillet has warmed up, coat with 1 tablespoon of canola oil and add the chicken. Cook until done, when no longer pink inside, about 5 minutes. Add the peppers, optional carrots, minced garlic and ginger. Stir together and allow to cook for 4-5 minutes or until peppers have softened.
Remove from skillet and set aside.
Coat skillet with remaining 1 tablespoon of canola oil and add the pre-cooked rice. Spread the rice out around the skillet so as much of it is covering the surface as possible. Allow to sit (untouched) for 5 minutes or until slightly browned on the side. Stir around the pan and allow other side of rice to cook for additional 3-4 minutes.
Once the rice is browned, add back in the chicken, peppers, garlic and ginger. Add in the coconut aminos and rice wine vinegar. Add the frozen peas and stir together. Allow to cook for 2-3 minutes until combined.
In the center of the skillet, make a hole by pushing back the rice-chicken-veggie mixture towards the outer edges. In the hole, add the egg whites and stir. Egg whites will cook quickly so make sure to stir rapidly until they are scrambled. Once they are fully cooked, combine the eggs in with the rest of the mixture.
Confession: I grew up as a red meat vegetarian, and while I’ve started to eat meat over the last 10 years, I really do not like to cook it. I’m scared of it for some reason. I like to eat meat medium rare, even slightly rare, but I’m always afraid that I’m going to poison myself, so I overcook it. And then it turns out rubbery. I’m more comfortable with chicken and I know when it’s done. It feels like red meat is open to interpretation…you can call it done whenever you want. As a side note, if anyone has any tips on how to get over this completely irrational fear and cook meat properly, please let me know.
As such, I have fewer red meat recipes than chicken, turkey or fish. However, I discovered this one when I was eating a version of a steak sandwich at a restaurant and realized it might be do-able. There are 4 reasons why this is an incredible recipe:
I can successfully cook it, as the meat gets cooked all the way through (I can handle that).
It reminds me of home. I’m from Philly where, traditionally, we eat cheesesteaks. A cheesesteak is similar to a steak sandwich, except it has grilled onions and either provolone or ‘whiz (see HERE). They are AMAZING. They’re cooked to perfection and the cheese gets all melty and the bread is crispy…ok, this is making me hungry. No one does it better than Philly. After I was diagnosed with CKD, I found this restaurant that had a steak sandwich, which is similar to a cheesesteak but doesn’t have the cheese. It had the perfectly toasted bread, steak, grilled onions and this amazing horseradish sauce. It wasn’t a cheesesteak but it was close enough and I was hooked.
This is good for lunch or for dinner. Right now, I’m eating it with a cup of soup and calling it dinner.
The sauce: This uses a version of my all-time favorite sauce from My Redheaded Burger Fantasy recipe. Just like the original, I cannot begin to tell you how amazing this sauce is.
All in all, this recipe creates the most fantastic sandwich, whether you’re from Philly or not.
Original Recipe: Courtesy of Westville Restaurant (although there are recipes for this…see HERE for The Barefoot Contessa version)
Revised Recipe: Me 🙂 Jackie
Servings: 2-4, depending on how large your rolls are
Prep Time: 10 minutes
Cook Time: 10-15 minutes
Ingredients:
1 (12-ounce) 1-inch thick New York strip boneless beef top loin steak
NOTE: I’ve also done this recipe with a ribeye, hanger or flank steak – they all work, as long as they’re around 1 inch thick
Freshly ground black pepper
Salt-Free Steak Seasoning
Olive oil & canola oil
2 yellow onions, sliced very thin (if you have a mandolin, use it)
1/2 teaspoon fresh thyme leaves
1 recipe Mustard Mayo, recipe follows
4 Hawaiian rolls (I like King’s Hawaiian. If you can’t find these, any white rolls will do)
Optional: 1/2 cup baby arugula
Optional: 1/2 cup button mushrooms
Mustard Mayo:
1/3 cup mayonnaise
1 tablespoon Dijon mustard
1 tablespoon whole-grain mustard
1/3 cup sour cream
Directions
NOTE/TIP FOR THE STEAK:
The key to this recipe is slicing the steak paper thin. I do this by first freezing the steak for an hour before I’m ready to use it. Take it out of the freezer and make really thin slices. Set aside those pieces and allow them to come back to room temperature and then proceed below.
MEAT 🙂
Season the steak with salt-free steak seasoning and pepper on both sides. Heat 1 tablespoon of olive oil in a medium saute pan over high heat until it’s almost smoking. Add the steak. Cook all the way through and remove from the pan.
Using the same saute pan, heat 1 1/2 tablespoons of olive oil over medium heat. Add the onion and thyme and saute for 10 minutes, until the onions are brown and caramelized, stirring occasionally. If using mushrooms, add these in at the same time as the onions.
To assemble the sandwiches, spread a tablespoon of Mustard Mayo on the bottom half of each bun. Place a layer the steak strips on top of the mayo, sprinkle with salt and pepper, and top with the caramelized onion rings. Place the baby arugula on top of the onion rings, and cover the sandwiches with the top half of the buns.
Mustard Mayo:
Whisk the ingredients together in a small bowl. Serve at room temperature.
I remember the first time I went into Chipotle. It was awhile ago – probably 7 or 8 years ago – and everyone at my office had been raving about it. I always liked Mexican but I couldn’t imagine how fast-food Mexican could be different than Taco Bell. But one afternoon, I decided to go and fell in love. There was so much goodness in that one bowl…the creamy guacamole, the spice of the salsa, chicken, beans, rice…it was like someone managed to take all of the best parts of a plate of nachos, throw them on rice, and call it a day. It was like heaven and I think I went back at least a dozen times.
And then two things happened: 1. I read an article online about the calorie and fat content of Chipotle and nearly fell out of my chair. My amazing dream of a lunch was close to 52 grams of fat and 1,000 calories (and that’s without the side of chips). And did I mention the sodium? It was more than half of the recommended daily intake. And then a couple of years later, #2 happened: I went on the CKD diet and all thoughts and forms of fast-food became a hazy memory.
But in my quest to find food that fit the diet and I enjoyed, I was in my office, watching someone eating Chipotle, and it occurred to me that the basics of the burrito bowl I had fallen in love with a few years ago were, in fact, on the diet. If I removed the beans and the cheese, all of the individual items I included in my bowl were acceptable. I ran home that night to make it, so here is the recipe.
I will note that there are two ways to make this: 1. With rice as your base and 2. With lettuce as your base. Sometimes I make this for dinner (see #1) and sometimes I make this for lunch (see #2) – it’s flexible and easy.
Serving Size: 2 people, if you want more, just double it
Prep Time: 30 Minutes
Cook Time: 30 Minutes
Ingredients:
1 cup uncooked white rice (if you want to make this for 4 people, just double this)
4 peppers (I prefer red)
2 tablespoons of canola oil
1 lb lean ground turkey
1-2 chopped jalapenos
2 cups frozen corn
1 small red onion, chopped finely
1 lime
1 tablespoon paprika
1 tablespoon cumin
2 teaspoons cayenne pepper
1/2 cup cilantro
Sour Cream (optional)
Avocado (Optional)
Hot Sauce (Optional)
Directions:
Roast the Peppers (This step is optional): If you prefer your peppers roasted, set your oven for 400 degrees. Slice the peppers into thin strips and toss them in 1 tablespoon of canola oil. Roast them in the oven for 20 minutes. Flip them onto the other side and put them back in the oven for another 10 minutes. Remove and allow to cool. Once at room temperature, dice them into smaller, bite-sized pieces. Set aside.
Cook the rice according to the package instructions. Set aside.
Defrost the corn in the microwave by adding corn and a tablespoon of water in a microwave-safe bowl. Depending on your microwave, start at 90 seconds and see if it’s done. Add another 15-20 seconds until defrosted. Drain and allow to cool.
ALTERNATIVE: You can make the Corn Salsa from my recipe and use this instead. If you choose to do this, omit the jalapeño and red onion from this recipe.
Pour 1 tablespoon of canola oil to a large pan on medium heat and add the chopped red onion. After 2-3 minutes when it starts to soften, add the raw ground turkey. Break up into small pieces and allow to cook all the way through, about 8 minutes.
After all of the pink has disappeared from the ground turkey and it is cooked through, add your spices – the paprika, cumin and cayenne pepper. Stir together so all of the turkey is coated. All to sit for 3-4 minutes so the oil/juice is soaked up and the meat has turned a dark red color from the spices.
While the turkey is cooking, start to assemble your bowl. Place some rice at the bottom, then add the roasted red peppers and corn. Then add some of the jalapeños (be careful not to add too many if you don’t like it spicy…remember, the turkey is spicy too). If using avocado, cut up a few small chunks and add it to the bowl. When the turkey is done cooking, add it to the top.
If you’re using sour cream, add a tablespoon on top of the turkey and then sprinkle on your chopped cilantro. If you like hot sauce, add this as well. Finally, squeeze the lime over the whole bowl. Repeat for multiple people/bowls.