My Go-To Corn Salsa

IMG_1317

This is my absolutely, hands down, my favorite recipe from the last few years of being on the CKD diet.  I make this recipe so frequently – it’s permanently engrained in my brain. At this point, I could get corn salsa tattooed on my arm.  Or maybe I could frame a picture of it in my living room.  Have I mentioned that I’m slightly obsessed with this recipe??  🙂

Here’s why: when I get home from work at night, I usually want something to snack on. With CKD, there’s not a whole lot in a bag that I can turn to – I can have salt-free pretzels, rice crackers, graham crackers, but all of those items make me feel like I’m going to gain 50 pounds by the end of the bag.  And, on their own, they’re boring. Sure, I can eat an entire bag of pretzels, but my mouth would be as dry as a piece of cardboard by the end.  I need something with them – something that fills me up so I don’t eat as many. I need a dip.  And for me, this is the perfect solution.

It takes me all of 10 minutes to make and is corn-based, which is acceptable for CKD.  It’s got a kick of spice, which I love, and if I make a batch, I can add it to the top of fajitas, chicken, or even a salad.

I have two versions of this recipe so I’m going to post both. There’s not a drastic difference between the two in terms of taste – it’s more about what ingredients I happen to have on hand.


Both recipes were inspired by the same thing: Trader Joe’s Corn & Chile Salsa.  Have you ever had this?  IT’S AMAZING.  It’s sweet and spicy at the same time. I literally could eat an entire jar…which is what made me think that perhaps I could make it myself.

79614-corn-chile-salsa
The Holy Grail

If you haven’t tried this, DO IT. Or…maybe not. You will be obsessed.

The first version of this recipe is literally a replica of this jarred wonder:

Version 1:

Original Recipe Found HERE

Revised Recipe: Me 🙂 Jackie

Ingredients
  • 4 medium ears of sweet corn unhusked or 1 bag of frozen corn (NOTE: check salt content to make sure there isn’t any)
  • ¼ cup finely diced sweet yellow onion (NOTE: if you like more of an onion flavor, feel free to use red onion as an alternative)
  • ¼ cup finely diced red bell pepper
  • 1-2 teaspoons finely chopped jalapeno pepper start with 1 and add more, if you want more heat
  • 3 tablespoons distilled white vinegar
  • 3 tablespoons sugar
  • 1 teaspoon mustard seeds
  • 1 teaspoon ground coriander
  • ½ teaspoon cumin powder
  • ½ teaspoon crushed red pepper
Instructions
  1. If using frozen corn, defrost according to package instructions
  2. If using fresh corn, place 2 ears at a time in the microwave and cook for 5 minutes on high power. Carefully, with oven mitts, remove corn from microwave and allow to cool for 5 minutes. Repeat with remaining 2 ears of corn. When cool enough to handle, pull off husks and silk. Lay corn on it’s side and cut kernels from cobs, rotating the ear of corn as you go. Transfer corn to a medium size bowl.
  3. Add diced onion, red bell pepper and finely chopped jalapeño to bowl with the corn. Stir to combine.
  4. Combine vinegar, sugar, mustard seeds, coriander, cumin, and crushed red pepper in a medium size, microwave safe bowl. Stir well to combine. Microwave on high power for 1 minute.
  5. Remove vinegar mixture from microwave and add to bowl with corn mixture. Stir well.
  6. Allow salsa to sit at room temperature for 15 minutes, stirring every 5 minutes.
  7. Serve immediately or transfer to a glass jar or storage container and refrigerate till ready to use. Salsa will keep in refrigerator for 5 days to 1 week.

    IMG_1315


Version 2: This is a more basic edition of the above recipe and isn’t quite as sweet. If you’re looking for more of a true salsa, this would be your pick.

Original & Revised Recipe: ME 🙂 Jackie (I came up with this!)

Ingredients

  • 4 medium ears of sweet corn unhusked or 1 bag of frozen corn (NOTE: check salt content to make sure there isn’t any)
  • ¼ cup finely diced red onion
  • 1 finely chopped jalapeno pepper
  • 1 lime
  • ½ teaspoon cumin powder
  • 1 tablespoon honey or agave nectar (feel free to add more or less depending on your taste)

Instructions

  1. If using frozen corn, defrost according to package instructions
  2. If using fresh corn, place 2 ears at a time in the microwave and cook for 5 minutes on high power. Carefully, with oven mitts, remove corn from microwave and allow to cool for 5 minutes. Repeat with remaining 2 ears of corn. When cool enough to handle, pull off husks and silk. Lay corn on it’s side and cut kernels from cobs, rotating the ear of corn as you go. Transfer corn to a medium size bowl.
  3. Add diced onion and finely chopped jalapeño to bowl with the corn.
  4. Add cumin, honey, the juice of 1 lime and stir together to combine.

NOTE: Both recipes get better after they’ve sat in the refrigerator, so try not to eat the entire thing immediately after you’ve finished making it. Be patient – it’s worth it!

Roasted Red Pepper Dip

I like pretty foods – anything that’s a bright color or has multiple colors. And this dip definitely satisfies this requirement.  It’s fresh, it’s easy and it’s really pretty. When you arrive to a party with this, everyone will look at it and say, “Oh wow!  What a pretty color!” And it really is.  And when they taste it, they’ll all want the recipe.  Little do they know that it takes just a little prep and uses ingredients you probably already have on hand.  It’s delicious!

Red pepper

Roasted Red Pepper Dip

Original Recipe: HERE

Revised Recipe: Me 🙂  Jackie

Yield: 1 1/12 Cups

INGREDIENTS

  • 1 bag of mini sweet peppers (Note: make sure you buy sweet and not spicy! They should be all different colors)
  • ounces cream cheese, softened
  • 2 tablespoons sour cream
  • 2 cloves chopped garlic
  • teaspoons canola oil
  • teaspoons balsamic vinegar
  • 6 whole basil leaves or 1 tablespoon dried basil

DIRECTIONS

  1. Preheat the oven to 400 degrees.
  2. Cut off the tops from all of the mini peppers.  Lay them on a sheet pan and toss them in the 2 tablespoons of canola oil.
  3. Put them in the oven for 15 minutes. Remove the pan and move the peppers around, flipping them so the bottoms are now on the top. Put them back into the oven for 6-7 minutes.  Remove them from the oven and allow them to cool.
  4. Once the peppers have cooled, put them into a food processor, along with the cream cheese, sour cream, garlic, balsamic vinegar and basil.
  5. Blend until smooth.
  6. Serve with broccoli florets, baby carrots, apsparagus spears, bell-pepper spears, or salt-free tortilla chips.


Emily’s (or Marissa’s) Buffalo Chicken Meatballs

This is recipe that is hotly contested amongst my group of friends.  Originally, my friend Marissa made this recipe at a party she threw a few years ago. We all loved it, not just because it was so tasty, but also because Marissa’s idea of a party is to have 3x more booze than food. So when she does bring out a few small bites, we all attack like starving wolves and inhale whatever she serves.

After that party, my other friend, Emily, asked Marissa for the recipe for these little wonders.  Since then, Emily has served them at all of her parties and people have since forgotten that they originally came from Marissa (btw, I don’t think anyone has truly forgotten that Marissa originally made them – I just think that Emily actually makes them better than Marissa did. The meatballs come out lighter, not as dry, and just the right amount of kick).  I, in turn, have passed this recipe along to my family and they all refer to it as “Emily’s Buffalo Chicken Meatballs,” when in reality, it’s actually Marissa’s.  Confusing, I know.  Just don’t mention this to Marissa.

The point is that this is one very tasty recipe and you don’t need to be on a CKD diet to appreciate it.  In addition to serving it at parties as an appetizer, I also make it for dinner (and serve it over rice) and you can freeze it. If you like buffalo sauce at all, you will love this.


Image result for buffalo chicken meatballs

Ingredients

  • 2 tablespoons vegetable oil
  • 4 tablespoons (1/2 stick) unsalted butter
  • 1/3 cup hot sauce (Note: traditionally, hot sauce has a lot of salt. While Frank’s [the original, not the buffalo, which has less salt] will forever be my favorite, you can also make your own. I’ll post the recipe below for reference.)
  • 1 pound ground chicken, preferably thigh meat
  • 1 large egg
  • 1/2 celery stalk, minced
  • 3/4 cup bread crumbs (Note: please see my tips for low-sodium bread crumbs in the Green Bean Casserole Recipe)

Preparation

Preheat the oven to 450°F. Drizzle the vegetable oil into a 9×13-inch baking dish and use your hand to evenly coat the entire surface. Set aside.

Combine the butter and hot sauce in a small saucepan, and cook over low heat, whisking until the butter is melted and fully incorporated. Remove from the heat and allow the mixture to cool for 10 minutes.

Combine the hot sauce mixture, ground chicken, egg, celery, and bread crumbs in a large mixing bowl and mix by hand until thoroughly incorporated.

Roll the mixture into round, 3/4 -inch balls, making sure to pack the meat firmly. Place the balls in the prepared baking dish, being careful to line them up snugly and in even rows vertically and horizontally to form a grid. The meatballs should be touching one another.

Roast for 15 to 20 minutes, or until the meatballs are firm and cooked through. A meat thermometer inserted into the center of a meatball should read 165°F.

If serving at a party, keep warm in a slow cooker.


DIY Low-Sodium Wing Sauce

2-4 tablespoons Tabasco (to taste)
2 tablespoons tomato paste
2 tablespoons brown sugar
1 tablespoon apple cider vinegar
1 tablespoon freshly squeezed lemon juice

Melt butter in a medium saucepan. Reduce heat and whisk in tomato paste, brown sugar, vinegar and lemon juice.

Minty Pea Pesto Dip

About a year ago, I went over my friend’s apartment for her annual anti-Valentine’s Day gathering, which basically entails about 15 girls determined to enjoy Valentine’s Day via friends, booze and snacks.  It’s really just a reason to get together and drink. Of note: my friend who has hosted this bash in the past now has a boyfriend (yay!) so we’re going to have to plan around her this year.

sweetpeacrostini-300x210

One of the dishes that she made was Giada DiLaurentiis’ Pea Pesto Crostini. Knowing I’m on my diet, she showed me the list of ingredients before offering me one (I have great friends).  Because of the parmesan and salt, I couldn’t eat it, but looking at the list of ingredients, it gave me some great ideas. I realized I could make my own version and infuse some new flavors.  And so, I give you a slightly revised version of Giada’s Pea Pesto Crostini.

Original Recipe: Courtesy of Food Network and Giada found HERE

Revised Recipe: Courtesy of Me 🙂 Jackie

Ingredients

  • 1 (10-ounce) package frozen peas, defrosted
  • 1 garlic clove
  • 1 lemon
  • 1/4 cup (or a good handful) of fresh mint
  • 1/4 teaspoon freshly ground black pepper, plus extra for seasoning
  • 1/3 cup olive oil or mix of olive and canola oil

Directions

Roughly chop the mint and place in a food processor, along with the peas, garlic, and ground pepper.  Pulse together.  With the machine running, slowly add the oil until well combined, about 1 to 2 minutes. Add the juice of the lemon and pulse a few more times.  Season with additional pepper as necessary.

This can be put on a crostini (as the original recipe calls for) or can be added on top of meat or fish. Or as a simple dip with crudite. It’s delicious so however you choose to eat it, I hope you enjoy!

Note: Photo cred goes to Kim Sunee

Easy Egg Cups

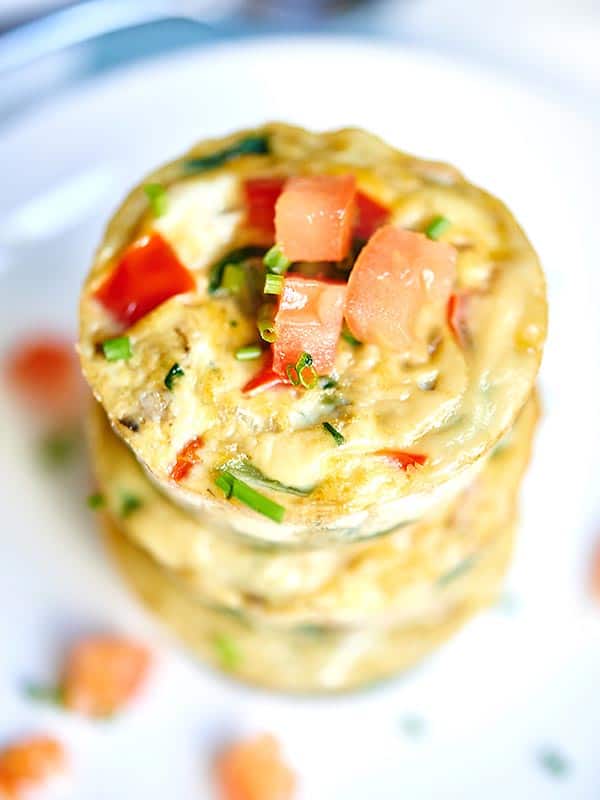
I love that these healthy egg muffin cups can be made in advance. These muffin cups have less than 50 calories per muffin and are packed with vegetables, so eat up and serve with some toast, your morning coffee, yogurt, etc! showmetheyummy.com #breakfast #healthy #togo #easyrecipes #vegetarian

(Picture Courtesy of showmetheyummy.com)

If there is one food that I eat more than anything else, it’s eggs.  I absolutely love eggs and always have.  Cooked, baked, hard boiled, soft boiled, fried…I love them all. Fortunately, eggs are fully acceptable as part of the CKD diet but because my cholesterol is a little on the high side (I’m a mess, I know), I try to stick with more eggs whites than yolks.

Around Passover (I’m Jewish), I was trying to find a breakfast dish that would be really fast in the morning and didn’t require any kind of bread, grain, or anything with that dreaded “Accepted for Passover” label (which basically meant that it had a lot of other stuff in it and wasn’t very tasty). So I started to look online to find ideas for how I could make eggs fast and portable and stumbled upon this recipe.  Not only was it super easy, but I could add whatever ingredients I wanted to make it work for me and my diet.  So I give you the easiest recipe in the world, egg muffin cups.

Healthy Egg Muffin Cups

Original Recipe Found HERE.

Revised Recipe Below: Me 🙂 Jackie

Prep Time: 10 Minutes
Cook Time: 15 Minutes
Total Time: 25 Minutes
Ingredients
  • 1 tablespoon vegetable or canola oil
  • 1 cup red pepper measured after chopping
  • 1 cup green pepper measured after chopping
  • 1 cup yellow onion measured after chopping
  • 1 cups steamed broccoli – roughly chopped measured/packed before chopping (Note: I buy this frozen but make sure there’s no added salt)
  • 1 cup mushrooms measured before chopping
  • 2 cloves garlic minced
  • 4 whole eggs
  • 4 egg whites (Note: If you’re like me, you can add more whites than this and take away from the whole eggs – the goal is just to have 8 total between whites and whole)
  • Pinch of cayenne pepper optional
  • Hot sauce optional for drizzling on top

Instructions

  1. Preheat oven to 350 degrees F.
  2. Grease a standard non stick 12-slot muffin pan with cooking spray and set aside.
  3. Heat a large non stick skillet over medium heat.
  4. Once hot, add in oil, red pepper, green pepper, and onion.
  5. Saute 5-7 minutes, or until peppers are tender.
  6. Add in broccoli and mushrooms and cook for an additional 2 minutes.
  7. In the last 30 seconds, add in minced garlic.
  8. Remove from heat.
  9. Crack eggs/egg whites into a large 4 cup measuring cup and whisk together.
  10. Stir in cooked veggies. If adding cayenne, add the pinch to the mixture and stir together.
  11. Pour the egg/veggie mixture evenly into the prepared muffin pan.
  12. Bake for 15-20 minutes, or until the tops are firm to the touch and eggs are cooked.
  13. Cool slightly and serve immediately!
  14. Leftovers can be stored in an airtight container in the fridge for about 4 days.
  15. These may also be frozen.
  16. To reheat, pop them in the microwave until warm.