I’m-From-Philly Steak Sandwich

img_1335.jpg

Confession: I grew up as a red meat vegetarian, and while I’ve started to eat meat over the last 10 years, I really do not like to cook it.  I’m scared of it for some reason.  I like to eat meat medium rare, even slightly rare, but I’m always afraid that I’m going to poison myself, so I overcook it.  And then it turns out rubbery.  I’m more comfortable with chicken and I know when it’s done. It feels like red meat is open to interpretation…you can call it done whenever you want.  As a side note, if anyone has any tips on how to get over this completely irrational fear and cook meat properly, please let me know.

As such, I have fewer red meat recipes than chicken, turkey or fish.  However, I discovered this one when I was eating a version of a steak sandwich at a restaurant and realized it might be do-able.  There are 4 reasons why this is an incredible recipe:

  1. I can successfully cook it, as the meat gets cooked all the way through (I can handle that).
  2. It reminds me of home.  I’m from Philly where, traditionally, we eat cheesesteaks.  A cheesesteak is similar to a steak sandwich, except it has grilled onions and either provolone or ‘whiz (see HERE). They are AMAZING.  They’re cooked to perfection and the cheese gets all melty and the bread is crispy…ok, this is making me hungry.  No one does it better than Philly.  After I was diagnosed with CKD, I found this restaurant that had a steak sandwich, which is similar to a cheesesteak but doesn’t have the cheese.  It had the perfectly toasted bread, steak, grilled onions and this amazing horseradish sauce.  It wasn’t a cheesesteak but it was close enough and I was hooked.
  3. This is good for lunch or for dinner.  Right now, I’m eating it with a cup of soup and calling it dinner.
  4. The sauce: This uses a version of my all-time favorite sauce from My Redheaded Burger Fantasy recipe.  Just like the original, I cannot begin to tell you how amazing this sauce is.

All in all, this recipe creates the most fantastic sandwich, whether you’re from Philly or not.

Original Recipe: Courtesy of Westville Restaurant (although there are recipes for this…see  HERE for The Barefoot Contessa version)

Revised Recipe: Me 🙂 Jackie

  • Servings: 2-4, depending on how large your rolls are
  • Prep Time: 10 minutes
  • Cook Time: 10-15 minutes

Ingredients:

  • 1 (12-ounce) 1-inch thick New York strip boneless beef top loin steak
    • NOTE: I’ve also done this recipe with a ribeye, hanger or flank steak – they all work, as long as they’re around 1 inch thick
  • Freshly ground black pepper
  • Salt-Free Steak Seasoning
  • Olive oil & canola oil
  • 2 yellow onions, sliced very thin (if you have a mandolin, use it) 
  • 1/2 teaspoon fresh thyme leaves
  • 1 recipe Mustard Mayo, recipe follows
  • 4 Hawaiian rolls (I like King’s Hawaiian. If you can’t find these, any white rolls will do)
  • Optional: 1/2 cup baby arugula
  • Optional: 1/2 cup button mushrooms
  • Mustard Mayo:
    • 1/3 cup mayonnaise
    • 1 tablespoon Dijon mustard
    • 1 tablespoon whole-grain mustard
    • 1/3 cup sour cream

Directions

NOTE/TIP FOR THE STEAK:

The key to this recipe is slicing the steak paper thin.  I do this by first freezing the steak for an hour before I’m ready to use it. Take it out of the freezer and make really thin slices.  Set aside those pieces and allow them to come back to room temperature and then proceed below.

IMG_1332
MEAT 🙂

Season the steak with salt-free steak seasoning and pepper on both sides. Heat 1 tablespoon of olive oil in a medium saute pan over high heat until it’s almost smoking.  Add the steak. Cook all the way through and remove from the pan.

Using the same saute pan, heat 1 1/2 tablespoons of olive oil over medium heat. Add the onion and thyme and saute for 10 minutes, until the onions are brown and caramelized, stirring occasionally. If using mushrooms, add these in at the same time as the onions.

To assemble the sandwiches, spread a tablespoon of Mustard Mayo on the bottom half of each bun. Place a layer the steak strips on top of the mayo, sprinkle with salt and pepper, and top with the caramelized onion rings. Place the baby arugula on top of the onion rings, and cover the sandwiches with the top half of the buns.

Mustard Mayo:

Whisk the ingredients together in a small bowl. Serve at room temperature.

IMG_1334

ENJOY!

img_1335.jpg

Better-than-Chipotle Burrito Bowl

IMG_1320

I remember the first time I went into Chipotle. It was awhile ago – probably 7 or 8 years ago – and everyone at my office had been raving about it.  I always liked Mexican but I couldn’t imagine how fast-food Mexican could be different than Taco Bell.  But one afternoon, I decided to go and fell in love.  There was so much goodness in that one bowl…the creamy guacamole, the spice of the salsa, chicken, beans, rice…it was like someone managed to take all of the best parts of a plate of nachos, throw them on rice, and call it a day.  It was like heaven and I think I went back at least a dozen times.

And then two things happened: 1. I read an article online about the calorie and fat content of Chipotle and nearly fell out of my chair. My amazing dream of a lunch was close to 52 grams of fat and 1,000 calories (and that’s without the side of chips). And did I mention the sodium?  It was more than half of the recommended daily intake.  And then a couple of years later, #2 happened: I went on the CKD diet and all thoughts and forms of fast-food became a hazy memory.

But in my quest to find food that fit the diet and I enjoyed, I was in my office, watching someone eating Chipotle, and it occurred to me that the basics of the burrito bowl I had fallen in love with a few years ago were, in fact, on the diet.  If I removed the beans and the cheese, all of the individual items I included in my bowl were acceptable. I ran home that night to make it, so here is the recipe.

I will note that there are two ways to make this: 1. With rice as your base and 2. With lettuce as your base. Sometimes I make this for dinner (see #1) and sometimes I make this for lunch (see #2) – it’s flexible and easy.

Original Recipe: Chipotle (Chipotle’s Nutrition Link)

Revised Recipe: Me 🙂 Jackie

Serving Size: 2 people, if you want more, just double it

Prep Time: 30 Minutes

Cook Time: 30 Minutes

Ingredients:

  • 1 cup uncooked white rice (if you want to make this for 4 people, just double this)
  • 4 peppers (I prefer red)
  • 2 tablespoons of canola oil
  • 1 lb lean ground turkey
  • 1-2 chopped jalapenos
  • 2 cups frozen corn
  • 1 small red onion, chopped finely
  • 1 lime
  • 1 tablespoon paprika
  • 1 tablespoon cumin
  • 2 teaspoons cayenne pepper
  • 1/2 cup cilantro
  • Sour Cream (optional)
  • Avocado (Optional)
  • Hot Sauce (Optional)

Directions:

  1. Roast the Peppers (This step is optional): If you prefer your peppers roasted, set your oven for 400 degrees. Slice the peppers into thin strips and toss them in 1 tablespoon of canola oil.  Roast them in the oven for 20 minutes. Flip them onto the other side and put them back in the oven for another 10 minutes. Remove and allow to cool.  Once at room temperature, dice them into smaller, bite-sized pieces. Set aside.
  2. Cook the rice according to the package instructions. Set aside.
  3. Defrost the corn in the microwave by adding corn and a tablespoon of water in a microwave-safe bowl.  Depending on your microwave, start at 90 seconds and see if it’s done.  Add another 15-20 seconds until defrosted. Drain and allow to cool.
    • ALTERNATIVE: You can make the Corn Salsa from my recipe and use this instead.  If you choose to do this, omit the jalapeño and red onion from this recipe.
  4. Pour 1 tablespoon of canola oil to a large pan on medium heat and add the chopped red onion.  After 2-3 minutes when it starts to soften, add the raw ground turkey.  Break up into small pieces and allow to cook all the way through, about 8 minutes.
  5. After all of the pink has disappeared from the ground turkey and it is cooked through, add your spices – the paprika, cumin and cayenne pepper.  Stir together so all of the turkey is coated.  All to sit for 3-4 minutes so the oil/juice is soaked up and the meat has turned a dark red color from the spices.
  6. While the turkey is cooking, start to assemble your bowl.  Place some rice at the bottom, then add the roasted red peppers and corn.  Then add some of the jalapeños (be careful not to add too many if you don’t like it spicy…remember, the turkey is spicy too).  If using avocado, cut up a few small chunks and add it to the bowl.  When the turkey is done cooking, add it to the top.
  7. If you’re using sour cream, add a tablespoon on top of the turkey and then sprinkle on your chopped cilantro.  If you like hot sauce, add this as well.  Finally, squeeze the lime over the whole bowl.  Repeat for multiple people/bowls.

ENJOY!

Emily’s (or Marissa’s) Buffalo Chicken Meatballs

This is recipe that is hotly contested amongst my group of friends.  Originally, my friend Marissa made this recipe at a party she threw a few years ago. We all loved it, not just because it was so tasty, but also because Marissa’s idea of a party is to have 3x more booze than food. So when she does bring out a few small bites, we all attack like starving wolves and inhale whatever she serves.

After that party, my other friend, Emily, asked Marissa for the recipe for these little wonders.  Since then, Emily has served them at all of her parties and people have since forgotten that they originally came from Marissa (btw, I don’t think anyone has truly forgotten that Marissa originally made them – I just think that Emily actually makes them better than Marissa did. The meatballs come out lighter, not as dry, and just the right amount of kick).  I, in turn, have passed this recipe along to my family and they all refer to it as “Emily’s Buffalo Chicken Meatballs,” when in reality, it’s actually Marissa’s.  Confusing, I know.  Just don’t mention this to Marissa.

The point is that this is one very tasty recipe and you don’t need to be on a CKD diet to appreciate it.  In addition to serving it at parties as an appetizer, I also make it for dinner (and serve it over rice) and you can freeze it. If you like buffalo sauce at all, you will love this.


Image result for buffalo chicken meatballs

Ingredients

  • 2 tablespoons vegetable oil
  • 4 tablespoons (1/2 stick) unsalted butter
  • 1/3 cup hot sauce (Note: traditionally, hot sauce has a lot of salt. While Frank’s [the original, not the buffalo, which has less salt] will forever be my favorite, you can also make your own. I’ll post the recipe below for reference.)
  • 1 pound ground chicken, preferably thigh meat
  • 1 large egg
  • 1/2 celery stalk, minced
  • 3/4 cup bread crumbs (Note: please see my tips for low-sodium bread crumbs in the Green Bean Casserole Recipe)

Preparation

Preheat the oven to 450°F. Drizzle the vegetable oil into a 9×13-inch baking dish and use your hand to evenly coat the entire surface. Set aside.

Combine the butter and hot sauce in a small saucepan, and cook over low heat, whisking until the butter is melted and fully incorporated. Remove from the heat and allow the mixture to cool for 10 minutes.

Combine the hot sauce mixture, ground chicken, egg, celery, and bread crumbs in a large mixing bowl and mix by hand until thoroughly incorporated.

Roll the mixture into round, 3/4 -inch balls, making sure to pack the meat firmly. Place the balls in the prepared baking dish, being careful to line them up snugly and in even rows vertically and horizontally to form a grid. The meatballs should be touching one another.

Roast for 15 to 20 minutes, or until the meatballs are firm and cooked through. A meat thermometer inserted into the center of a meatball should read 165°F.

If serving at a party, keep warm in a slow cooker.


DIY Low-Sodium Wing Sauce

2-4 tablespoons Tabasco (to taste)
2 tablespoons tomato paste
2 tablespoons brown sugar
1 tablespoon apple cider vinegar
1 tablespoon freshly squeezed lemon juice

Melt butter in a medium saucepan. Reduce heat and whisk in tomato paste, brown sugar, vinegar and lemon juice.

Canadian Buddha Bowl

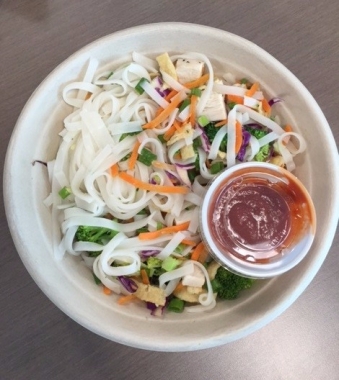
Between mid-2015 and 2016, I spent close to a year living in Toronto and absolutely loved it. I could talk endlessly about how great it was, how much calmer it was than New York, how nice everyone is (or seems to be), but for this particular post, I will focus on one of the dishes I ate when I was there.  Next to my office in Toronto were two lunch spots – Salad Days (which I will post a recipe from at a later time) and Freshii.  When I moved back to the States, I went through a period of withdrawal, craving those lunches that I loved so much, so I recreated my favorite lunch from Freshii.  It was so easy and I learned about the joy of rice noodles (which taste just like pasta but cook much faster!). Plus, this is a recipe that doesn’t need to be refrigerated if you don’t add meat, so it’s portable and great for outdoor get-togethers.

As a side note, about 6 months after I got back from Toronto, I went on the Freshii website…and lo and behold, they’re here!  They’re in New York!  And their White Plains location is about 10 minutes from my office, so I drove over there as fast as I could.  So now, I have the option of making this myself or getting the real thing…they’re both delicious and both bring back my happy memories of Toronto.

freshii.com – Go visit if there’s one near you!

Freshii Logo


Buddha Satay

rice noodles, broccoli, carrots, cabbage, crispy wontons, green onions, spicy peanut sauce (Side Note: I ask to replace this with a simple vinaigrette on the side or just use sriracha on the side)

IMG_0117

Ingredients

  • 1 8-ounce package of rice noodles
  • 1 lb. of chicken breasts or pork tenderloin, cut into 1/2-inch cubes
  • 1/2 cups no-sodium chicken broth
  • 3 tablespoons vegetable oil
  • 1 bunch scallions, sliced (white and green parts separated)
  • 1 2-inch piece fresh ginger, peeled and minced
  • 4 cloves garlic, minced
  • 3 cups vegetables – as Freshii does, I use broccoli, a few shredded carrots, and purple cabbage, but any veggie would be good in here!
  • 1/3 cup chopped fresh cilantro
  • Juice of 1 lime
  • 5-6 corn tortillas, cut into strips
  • Freshly ground pepper

Directions

  1. Preheat the oven to 325 degrees.
  2. Cook the rice noodles according to the package instructions. Note: You can either boil the noodles like pasta or stir fry them. They both work well.
  3. Toss corn tortilla strips lightly in a little oil and place on a baking sheet.  Bake them until crisp with brown edges, about 8 minutes. Place them on the side.
  4. In a large skillet or wok, add 1 tablespoon of vegetable oil. Once the pan is hot, add the chicken or pork.  Cook until no longer pink, about 5 minutes.  Add the remaining 2 tablespoons vegetable oil to the pan, then add the scallions, ginger and garlic; reduce the heat to medium and cook, stirring, 2 minutes.
  5. Add the vegetables to the skillet and cook, stirring occasionally, until they start softening, about 2 minutes. Add the chicken broth and ground pepper. Cook, stirring occasionally, until the broth evaporates and the vegetables are crisp-tender, about 3 minutes.  Squeeze the lime on top and add the chopped cilantro.
  6. Stir all together and serve in a large bowl.  Add the tortilla strips on top.

If you’d like to add more of a sauce on top, you can either make a simple lime vinaigrette (found HERE, just omit the salt) or pour a little sriracha on top to add a kick.

ENJOY!


My Redheaded Burger Fantasy

I have a slight obsession with redheaded men. Not really because I’m attracted to them, but more because I think they’re going extinct.  I mean seriously, how many natural red-haired men are there (besides Price Harry, Ed Sheeran, Ron Howard, Seth Green, and maybe an odd TV star like Damian Lewis)?  I am on the hunt to find more and as a side note, please feel free to comment if you can think of more!  I need to add to my list.

That aside, I also love Bobby Flay. Not just because he’s a redheaded man but because I think he’s charismatic, funny (have you heard him on Z100?) and I love all of his restaurants.  Living in New York, Bobby Flay is a staple here and since I have an affinity of all things spicy, his restaurants are always on my list. I also watch all of his shows on the Food Network to get inspiration.

Here he is making my favorite burger:

bobby

Ahh, my favorite burger…it’s called the Crunchburger, which he sells at Bobby’s Burger Palace.  Upon eating this burger for the first time, I had an epiphany – a little crunch makes any dish, particularly burgers, so much better.  When I began with my CKD diet, I wasn’t sure if I’d be able to eat this burger, since A.) it had cheese on it and B.) the best part of the burger was the chips.  But alas, after much experimentation, I’ve found a perfect substitute that makes it CKD friendly.  At that, I give you my favorite redheaded burger with a CKD spin.

The Crunchburger

Original Recipe Found HERE (courtesy of the incomparable Bobby Flay)

Revised Recipe: ME 🙂 Jackie

Ingredients

  • 1 1/2 pounds lean ground meat chuck (85 percent lean) or ground turkey (90 percent lean)
  • Freshly ground black pepper
  • 1 1/2 tablespoons canola oil
  • 4 white hamburger buns, split; toasted, if desired (Tip: Buns are better toasted 🙂 )
  • 4 slices beefsteak tomato (optional)
  • 4 leaves romaine lettuce (optional)
  • 4 slices red onion (optional)
  • Horseradish Mustard Mayonnaise, recipe follows (optional)*
  • 4 handfuls of salt-free corn tortilla chips (Note: I am obsessed with Garden of Eatin’ blue corn chips, which you can find here. It’s just corn and oil.)
  • Optional for CKD Diets: If you want cheese on your burgers, you can buy rice cheese or Daiya cheese slices; however, please make sure you read the labels. These cheeses do have additives (including phosphates) and salt, so use in moderation.)

Horseradish Mustard Mayonnaise:

  • 1/4 cup mayonnaise
  • 2 tablespoons Dijon mustard
  • 2 tablespoons drained prepared horseradish
  • Freshly ground black pepper
  • 1 tablespoon of agave syrup or honey (optional – only if you want to tone down the spice of the horseradish)

Directions


Divide the meat into 4 equal portions (about 6 ounces each). Form each portion loosely into a 3/4-inch-thick burger and make a deep depression in the center with your thumb. Season both sides of each burger with pepper.

Heat the oil in the pan or griddle over high heat until the oil begins to shimmer. Cook the burgers until golden brown and slightly charred on the first side, about 3 minutes for beef and 5 minutes for turkey. Flip over the burgers. Cook beef burgers until golden brown and slightly charred on the second side, 4 minutes for medium rare or until cooked to desired degree of doneness. Cook turkey burgers until cooked throughout, about 5 minutes on the second side.

If using cheese, add to the tops of the burgers during the last minute of cooking and top with a basting cover, close the grill cover, or tent the burgers with aluminum foil to melt the cheese.

Place the burgers on the bun bottoms and, if desired, top with tomato, lettuce, onion, and a dollop of horseradish mustard mayonnaise. Pile on the corn chips, top with the bun tops, and serve immediately.

Horseradish Mustard Mayonnaise:

Whisk together the mayonnaise, mustard, and horseradish (and agave syrup or honey if desired) in a small bowl and season with pepper. Cover and refrigerate for at least 30 minutes to allow the flavors to meld. The sauce can be prepared 1 day in advance and kept covered in the refrigerator.

*One note on this sauce: I absolutely LOVE this sauce and use it all the time. I put it on sandwiches, fish, and sometimes I make it into a dressing by adding oil.  If you are not a horseradish fan, you probably won’t use this, but I’ve found the addition of something sweet like the honey or agave syrup helps to balance out that strong flavor nicely.

Enjoy!